
The Complete Guide to Proper Floor Levelling
Floor leveling is an essential preparatory step in the installation of a variety of flooring types such as timber, engineered timber, laminate, hybrid, and vinyl plank flooring. Achieving proper floor leveling is crucial as it ensures a seamless, durable, and visually appealing final surface.
Many homeowners wonder why floor leveling is necessary and why it should precede flooring or carpet installation. In this comprehensive guide, we address these questions and provide an overview of the key considerations and steps involved in floor leveling for different flooring types. Additionally, we offer valuable tips to assist you in successfully navigating this intricate task, especially if you choose to undertake the leveling process yourself (DIY self-leveling).
Understanding Floor Levelling Basics
Importance of Floor Leveling
- Stability and Durability: An uneven subfloor can cause the flooring material to flex or bend, leading to damage over time.
- Aesthetic Appeal: A level floor provides a smooth, uniform surface that enhances the overall appearance of the flooring.
- Performance: Proper leveling ensures that the flooring performs as intended, without issues like creaking, gaps, or uneven wear.
Steps in Floor Leveling
Assessment:
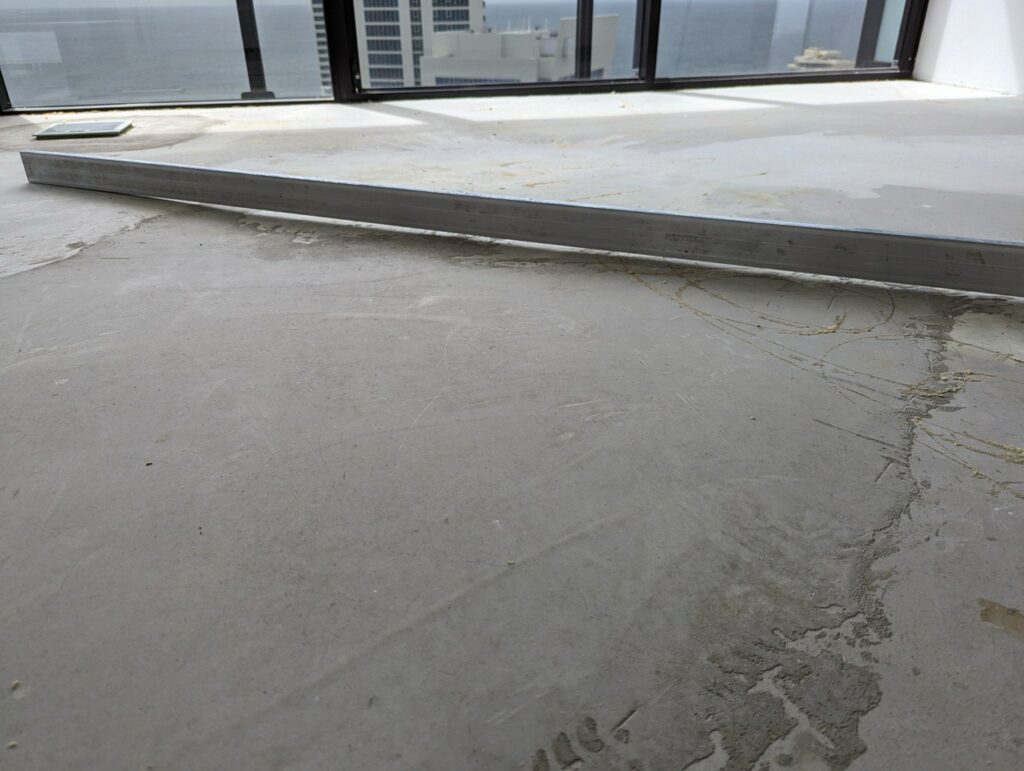
- Inspect the Subfloor: Determine the condition of the existing subfloor. Look for high spots, low spots, and overall unevenness.
- Measure Variations: Use a level or a laser leveling tool to measure the deviations across the floor. Note the areas that need attention.
Preparation:
- Clean the Subfloor: Remove any debris, dust, or old adhesive. A clean surface is essential for proper bonding of leveling compounds.
- Repair Damages: Fix any structural issues, such as cracks or holes in the subfloor.
Leveling Compounds:
- Self-Leveling Compound: For minor to moderate unevenness, a self-leveling compound can be used. This compound flows and settles into low areas, creating a smooth surface.
- Patching Compounds: For smaller areas or localized low spots, patching compounds can be used.
Application:
- Mixing: Follow the manufacturer’s instructions to mix the leveling compound.
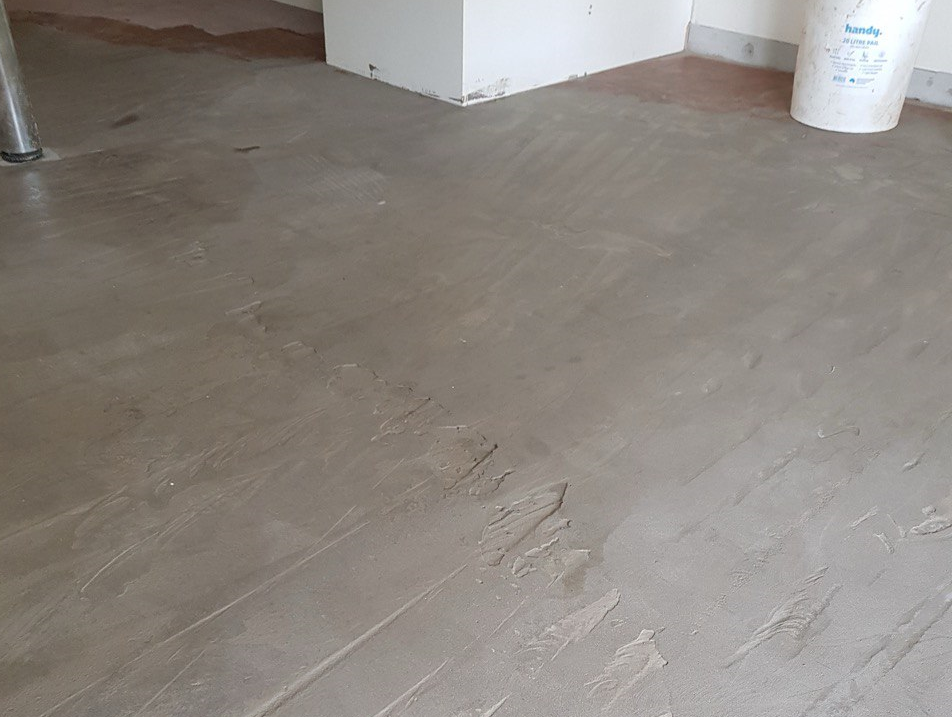
- Pouring and Spreading: Pour the compound onto the floor and use a trowel or spreader to distribute it evenly. For self-leveling compounds, minimal spreading is required as they settle naturally.
- Curing: Allow the compound to cure according to the manufacturer’s guidelines. This usually involves leaving it undisturbed for a specific period.
Sanding and Smoothing:
- After the leveling compound has cured, sand any high spots to ensure a completely smooth and level surface.
Final Inspection:
- Check the entire floor again with a level to ensure that it is even and ready for the flooring installation.
Considerations for Specific Flooring Types
Timber and Engineered Timber:
- Timber floors require a very flat surface to prevent creaking and movement. Engineered timber is slightly more forgiving but still benefits from a well-leveled subfloor.
Laminate:
- Laminate flooring can be sensitive to uneven surfaces, which can cause locking mechanisms to fail or planks to shift. A flat subfloor ensures the integrity of the interlocking system.
Hybrid Flooring:
- Hybrid floors, which combine the best features of vinyl and laminate, require a flat subfloor to maintain their stability and water-resistant properties.
Vinyl Plank Flooring:
- Vinyl planks are more flexible but still need a smooth surface to prevent telegraphing of imperfections from the subfloor. Any bumps or dips can show through the vinyl over time.
Tools and Materials
- Leveling Compounds: Self-leveling and patching compounds.
- Tools: Level, laser level, trowel, spreader, sanding tools, mixers and containers.
- Cleaning Supplies: Broom, vacuum, and cleaning agents to prepare the subfloor.
By following these steps and considerations, you can ensure a properly leveled subfloor, leading to a successful and long-lasting flooring installation.
Australia Floor Levelling Standards Basics
In Australia, the relevant standards for floor preparation and leveling, particularly for timber, engineered timber, laminate, hybrid, and vinyl plank flooring installations, are set by organizations such as Standards Australia. These standards provide guidelines on the required tolerances for subfloor flatness and levelness to ensure proper flooring installation. Here are some key Australian standards and the specific tolerances for different types of flooring:
Relevant Australian Standards
- AS 1884-2021: Floor coverings – Resilient sheet and tiles – Installation practices.
- AS 2455.1:2019: Textile floor coverings – Installation practice – General.
- AS 2455.2:2019: Textile floor coverings – Installation practice – Carpet tiles.
- AS 2685:2020: Timber and parquetry flooring – Sanding and finishing.
- AS 2796:2020: Timber – Hardwood – Sawn and milled products.
Tolerances for Subfloor Flatness and Levelness
Timber and Engineered Timber Flooring:
- Flatness Tolerance: The subfloor should be within ±3 mm over a 3 m span.
- Levelness Tolerance: The subfloor should be level within ±1.5 mm over a 1 m span.
Laminate Flooring:
- Flatness Tolerance: The subfloor should be within ±3 mm over a 3 m span.
- Levelness Tolerance: The subfloor should be level within ±1.5 mm over a 1 m span.
- Additional Requirements: Manufacturers may specify no more than 1 mm deviation over a 1 m span for optimal performance.
Hybrid Flooring:
- Flatness Tolerance: The subfloor should be within ±3 mm over a 3 m span.
- Levelness Tolerance: The subfloor should be level within ±1.5 mm over a 1 m span.
Vinyl Plank Flooring:
- Flatness Tolerance: The subfloor should be within ±3 mm over a 3 m span.
- Levelness Tolerance: The subfloor should be level within ±1.5 mm over a 1 m span.
- Additional Requirements: As with laminate, manufacturers may have more stringent requirements for optimal installation, such as no more than 1 mm deviation over a 1 m span.
Practical Steps for Ensuring Compliance
Inspection:
- Use a straightedge, laser level, or spirit level to check the subfloor for flatness and levelness.
- Identify and mark high and low spots.
Preparation:
- Grinding: For high spots, grinding may be required to bring the subfloor to the correct level.
- Self-Leveling Compound: For low spots, apply a self-leveling compound according to the manufacturer’s instructions.
Testing:
- Conduct moisture testing to ensure the subfloor is dry enough for the flooring installation. This is critical for preventing future issues such as warping or mold growth.
- Ensure the subfloor is clean and free of debris, dust, and contaminants.
Documentation:
- Follow the installation guidelines provided by the flooring manufacturer and document the subfloor preparation process, including all measurements and any corrective actions taken.
Common Materials to Use for a Floor Levelling
Floor leveling is essential to ensure a smooth and even surface for installing various types of flooring. The materials used for leveling concrete or timber subfloors include different types of compounds and products designed to fill in low spots and create a flat, level surface. Here are the commonly used materials:
For Concrete Subfloors
Self-Leveling Compound (SLC)
- Description: A cementitious product that flows and settles into low areas to create a smooth, level surface.
- Use: Ideal for correcting minor to moderate unevenness in concrete subfloors.
- Application: Mixed with water and poured onto the subfloor; it spreads and levels itself with minimal assistance.
Patching Compound
- Description: A thicker compound used to fill in small holes, cracks, or localized low spots.
- Use: Suitable for small repairs rather than leveling large areas.
- Application: Applied with a trowel to fill in imperfections.
Grinding and Scarifying
- Description: Mechanical methods to remove high spots on concrete.
- Use: Used to level out high points rather than filling in low areas.
- Tools: Floor grinders, scarifiers, or diamond grinders.
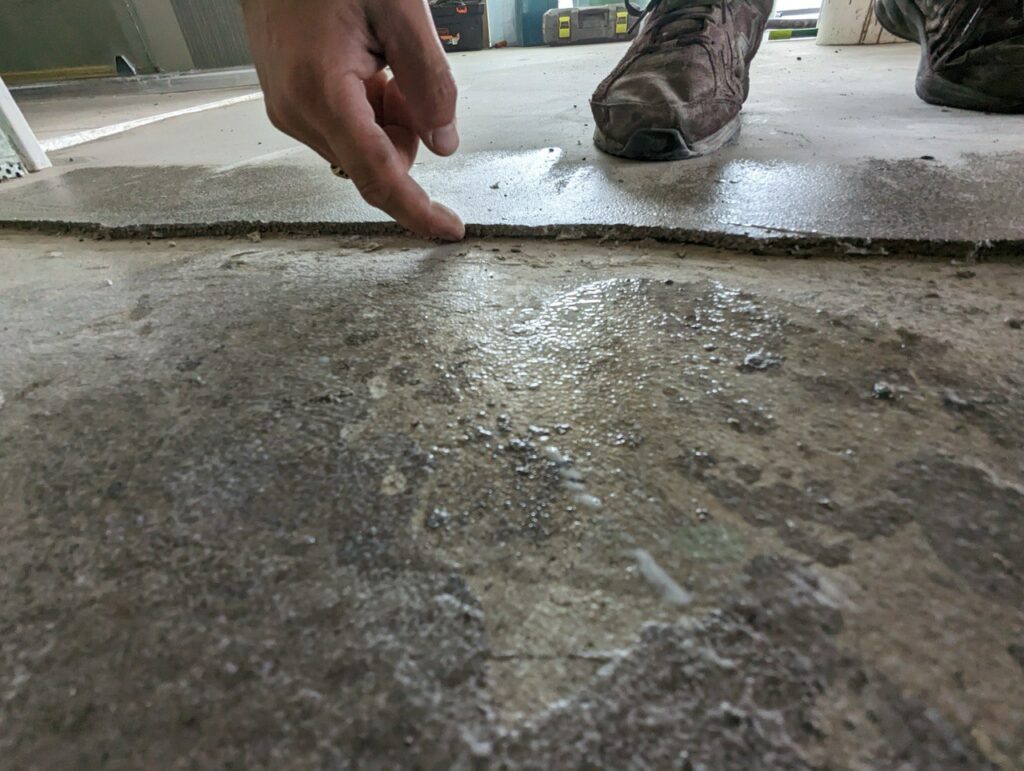
Primer
- Description: A preparatory coating applied to the concrete surface before applying a leveling compound.
- Use: Ensures proper adhesion of the leveling compound to the concrete subfloor.
- Application: Rolled or brushed onto the surface.
For Timber Subfloors
Self-Leveling Compound (SLC)
- Description: Similar to the SLC used on concrete, but specifically formulated for timber subfloor to be flexible.
- Use: Ideal for correcting minor to moderate unevenness.
- Application: Poured onto the subfloor and spread to achieve a level surface. May require reinforcement with mesh or primer for better adhesion.
Plywood Sheets
- Description: Thin sheets of plywood used to create a level surface over an uneven timber subfloor.
- Use: Suitable for significant leveling requirements or when the existing timber subfloor is severely uneven.
- Application: Nailed or screwed into place, often with an underlayment in between for added stability.
Underlayment
- Description: A layer of material (such as foam, cork, or rubber) placed between the subfloor and the flooring material.
- Use: Provides a smooth, level base and often adds soundproofing and cushioning.
- Application: Rolled out or laid in sheets over the timber subfloor.
Sanding
- Description: The process of sanding down high spots on a timber subfloor.
- Use: Used to level out small high points.
- Tools: Belt sander, orbital sander, or floor sander.
Screed Boards
- Description: Thin strips of wood used to build up low areas.
- Use: Helps create a level surface by filling in dips and low spots.
- Application: Attached to the subfloor with screws or nails, and then covered with plywood or underlayment.
Additional Considerations
- Moisture Barrier: Both concrete and timber subfloors may require a moisture barrier to protect against moisture that can cause damage to the flooring material.
- Adhesives: The correct type of adhesive should be used when installing leveling materials, especially for timber subfloors, to ensure proper bonding and stability.
- Compatibility: Always ensure that the leveling compounds and other materials are compatible with the type of flooring being installed and follow the manufacturer’s guidelines.
Choosing the right Floor Levelling Material or Method
The choice of leveling material depends on the type of subfloor (concrete or timber), the extent of unevenness, and the specific requirements of the flooring material to be installed. Proper preparation and leveling of the subfloor are critical to achieving a high-quality, durable flooring installation.
Most Common Floor Levelling Material Brands
Floor leveling products are essential for achieving a smooth and level surface before installing flooring. Both professionals and DIY enthusiasts commonly use several brands known for their reliability and effectiveness in floor leveling. Here are some of the most popular brands used in both sectors:
Brands Commonly Used by Professionals
ARDEX
- Products: ARDEX offers a wide range of leveling compounds and patching materials known for their high quality and performance. They cater to various substrates and leveling requirements.
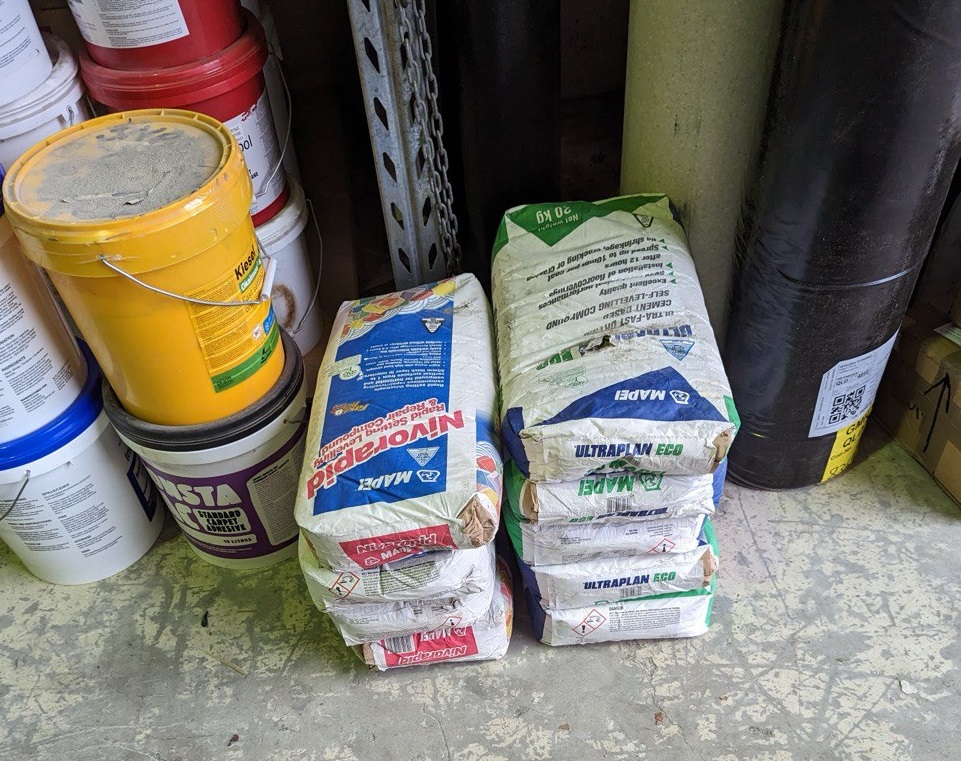
MAPEI
- Products: MAPEI provides self-leveling underlayments and patching compounds suitable for a variety of subfloor conditions. They are known for their versatility and ease of use.
LATICRETE
- Products: LATICRETE offers self-leveling underlayments and patches designed for fast leveling and smoothing of interior floors. They are known for their durability and reliability.
Custom Building Products
- Products: Custom Building Products offers a range of leveling compounds and patching materials suitable for both residential and commercial applications. They emphasize ease of use and consistent results.
Sika
- Products: Sika provides self-leveling compounds and repair mortars that are designed to meet a variety of flooring leveling needs. They are known for their high-performance formulations.
Brands Commonly Used by DIY Enthusiasts
Sika
- Overview: Sika offers a range of self-leveling compounds and repair mortars suitable for DIY projects. They are known for their high-quality products and ease of use..
Dunlop
- Overview: Dunlop provides a variety of leveling compounds and underlayments tailored for DIY floor leveling tasks. They emphasize user-friendly application and reliability.
Bostik
- Overview: Bostik offers self-leveling compounds and patching materials designed for both professionals and DIYers. They are recognized for their effective solutions and ease of application.
Mapei
- Overview: Mapei provides a comprehensive range of self-leveling compounds and repair mortars suitable for DIY floor leveling projects. They are known for their quality and versatility.
Davco
- Overview: Davco offers self-leveling underlayments and patching compounds that are commonly used by DIY enthusiasts in Australia. They provide solutions for various subfloor conditions.
Considerations for Choosing a Brand
Application Specificity: Different brands may offer products tailored for specific substrates (concrete, wood, etc.) or types of flooring (tile, vinyl, laminate, etc.). Choose a brand that matches your project requirements.
Ease of Use: DIY-friendly brands typically provide clear instructions and user-friendly packaging that simplifies the application process.
Performance and Durability: Professional-grade brands often emphasize high-performance formulations that offer durability and long-term reliability.
Availability: Consider the availability of the brand and its products in your local area or through online retailers.
Before choosing a specific brand, it’s essential to read product reviews, check compatibility with your subfloor and flooring type, and follow manufacturer instructions carefully for optimal results.
Some Floor Leveling Mistakes to Keep In Mind
Floor leveling is a critical step in ensuring a successful and long-lasting flooring installation. However, several common mistakes can compromise the outcome. Here are some of the most frequent errors and how to avoid them:
Common Mistakes in Floor Leveling
Inadequate Surface Preparation:
- Mistake: Failing to properly clean and prepare the subfloor before applying leveling compounds.
- Consequence: Debris, dust, or contaminants can prevent proper adhesion, leading to an uneven surface.
- Solution: Thoroughly clean the subfloor, removing all dust, dirt, grease, and loose particles. Use a vacuum and appropriate cleaning agents to ensure a spotless surface.
Ignoring Moisture Issues:
- Mistake: Overlooking moisture problems in the subfloor, especially on concrete slabs.
- Consequence: Moisture can cause leveling compounds to fail and damage the flooring material over time.
- Solution: Conduct moisture tests (e.g., calcium chloride test, relative humidity test) and address any issues with appropriate moisture barriers or sealants.
Incorrect Mixing of Leveling Compounds:
- Mistake: Not following the manufacturer’s instructions for mixing self-leveling or patching compounds.
- Consequence: Improperly mixed compounds may not set correctly, leading to weak or uneven surfaces.
- Solution: Carefully follow the manufacturer’s guidelines for mixing ratios, mixing time, and application methods.
Improper Application of Leveling Compounds:
- Mistake: Applying leveling compound unevenly or not using the right tools.
- Consequence: Results in an uneven surface that may not meet the required tolerances.
- Solution: Use the appropriate tools (e.g., trowels, spreaders) and techniques to ensure even application. Allow the compound to flow and settle naturally, assisting with a spreader as needed.
Not Using a Primer:
- Mistake: Skipping the application of a primer on the subfloor before applying the leveling compound.
- Consequence: Poor adhesion of the leveling compound to the subfloor, leading to failures.
- Solution: Apply a suitable primer as recommended by the leveling compound manufacturer to ensure proper bonding.
Inadequate Curing Time:
- Mistake: Not allowing sufficient curing time for the leveling compound before installing flooring.
- Consequence: Flooring installed on an uncured surface can lead to unevenness and other issues.
- Solution: Follow the manufacturer’s recommended curing time for the leveling compound before proceeding with flooring installation.
Neglecting to Check for Levelness:
- Mistake: Not verifying the flatness and levelness of the subfloor after applying the leveling compound.
- Consequence: Remaining high or low spots can affect the performance and appearance of the flooring.
- Solution: Use a straightedge, spirit level, or laser level to check the surface after the compound has cured. Address any remaining uneven areas.
Inappropriate Handling of High and Low Spots:
- Mistake: Failing to properly address significant high or low spots on the subfloor.
- Consequence: Can result in ongoing leveling issues that affect the flooring.
- Solution: For high spots, use grinding or sanding to level the area. For low spots, apply additional leveling compound or use patching compounds as needed.
Using Incorrect Products:
- Mistake: Using leveling products that are not suitable for the specific type of subfloor or flooring material.
- Consequence: Incompatibility issues that can lead to bonding failures and uneven surfaces.
- Solution: Choose leveling products that are compatible with the subfloor type (concrete, timber, etc.) and suitable for the intended flooring material.
Inadequate Thickness of Leveling Compound:
- Mistake: Applying the leveling compound too thinly, which can compromise its effectiveness.
- Consequence: Insufficient thickness may not provide the necessary support and can crack or break under pressure.
- Solution: Ensure the leveling compound is applied to the recommended thickness, typically specified by the manufacturer.
Important Note
Avoiding these common mistakes requires careful planning, attention to detail, and adherence to manufacturer guidelines. Proper surface preparation, moisture management, correct application techniques, and thorough inspection are key to achieving a level and stable subfloor ready for the flooring installation. If in doubt, hiring a professional floor leveling specialist can help ensure a high-quality result.
Consequences for Incorrect Floor Levelling and Flooring Warranty Failure
Improper floor leveling can have significant consequences on both the immediate and long-term performance of the flooring. Additionally, it can lead to warranty failures, as most flooring manufacturers require proper subfloor preparation as a condition of their warranty. Here are the key consequences and potential issues:
Consequences of Incorrect Floor Leveling
Flooring Performance Issues:
- Uneven Surface: An uneven subfloor can lead to visible unevenness in the flooring surface, detracting from the aesthetic appeal.
- Gaps and Seams: Poor leveling can cause gaps between planks or tiles, leading to an unsightly appearance and potential tripping hazards.
- Creaking and Noise: An uneven subfloor can cause the flooring to flex and move, resulting in creaking or popping noises when walked on.
- Delamination: For engineered and laminate flooring, an uneven subfloor can cause the layers to separate or delaminate, significantly reducing the lifespan of the flooring.
- Wear and Tear: Uneven surfaces can lead to uneven wear on the flooring material, causing certain areas to degrade faster than others.
Structural Integrity:
- Damage to Flooring Material: Uneven subfloors can cause excessive stress on flooring materials, leading to cracks, splits, or other damage over time.
- Compromised Adhesion: For glue-down flooring, an uneven subfloor can prevent proper adhesion, causing the flooring to lift or shift.
Moisture Issues:
- Moisture Intrusion: Incorrect leveling can create pockets where moisture can accumulate, leading to mold growth, warping, or damage to the flooring material.
- Insufficient Moisture Barrier: Failure to properly level the subfloor can compromise the effectiveness of moisture barriers, further exacerbating moisture-related problems.
Warranty Failures
Manufacturer’s Requirements:
- Installation Guidelines: Most flooring manufacturers specify detailed installation guidelines, including subfloor preparation and leveling requirements. Failure to adhere to these guidelines can void the warranty.
- Proof of Compliance: Manufacturers may require documentation proving that proper leveling and subfloor preparation were performed. Lack of documentation or evidence of non-compliance can lead to warranty denial.
Specific Warranty Terms:
- Flatness Tolerances: Warranties often specify flatness tolerances for the subfloor (e.g., within 3 mm over a 3 m span). Deviations beyond these tolerances can void the warranty.
- Adhesive and Product Compatibility: Using incompatible leveling compounds or adhesives can void the warranty, as it can lead to bonding failures and other issues.
Examples of Warranty Failures
Timber and Engineered Timber Flooring:
- Cupping and Warping: Improper leveling leading to moisture problems can cause timber to cup or warp, which is typically not covered under warranty if subfloor preparation was inadequate.
- Delamination: For engineered timber, improper leveling can cause delamination, which is often excluded from warranty coverage if the subfloor was not properly prepared.
Laminate Flooring:
- Separation and Gaps: Incorrect leveling can lead to gaps or separation between laminate planks, voiding the warranty.
- Surface Wear: Uneven wear due to an uneven subfloor is usually not covered under warranty.
Hybrid and Vinyl Plank Flooring:
- Lifting and Peaking: Improper leveling can cause lifting or peaking at the edges, which voids the warranty.
- Telegraphing: Subfloor imperfections showing through the surface of vinyl planks (telegraphing) are not covered under warranty if the subfloor was not properly leveled.
The Result
Incorrect floor leveling can have severe consequences on the performance and longevity of flooring installations. It can lead to a range of issues, from aesthetic problems to structural failures, and can significantly reduce the lifespan of the flooring. Moreover, failure to properly level the subfloor can void the manufacturer’s warranty, leaving homeowners responsible for costly repairs and replacements. Proper subfloor preparation, including meticulous leveling, is essential to ensure a successful flooring installation and to maintain warranty protection. Hiring a professional floor leveling specialist can help mitigate these risks and ensure that the installation meets all necessary standards and guidelines.
Importance to Hire Professional Floor Levelling Specialist vs DIY
Hiring a professional floor leveling specialist versus attempting a DIY project has significant implications for the outcome of your flooring installation. Here are the key reasons why hiring a professional is often the better choice:
Expertise and Experience
Technical Knowledge:
- Specialists: Professionals have the technical knowledge and training to assess and address a variety of subfloor conditions accurately. They understand the nuances of different materials and the best methods to use for each type of subfloor.
- DIY: While DIY enthusiasts may have general knowledge, they often lack the specialized expertise to handle complex leveling issues effectively.
Experience:
- Specialists: Professionals have extensive experience dealing with diverse scenarios, including uneven surfaces, moisture issues, and structural concerns. This experience enables them to anticipate problems and address them efficiently.
- DIY: Lack of experience can lead to mistakes that compromise the quality of the leveling and the flooring installation.
Quality of Work
Precision:
- Specialists: Professionals use advanced tools and techniques to achieve precise leveling, ensuring the subfloor meets industry standards and manufacturer requirements.
- DIY: DIY projects may lack the precision needed for a perfectly level subfloor, leading to potential issues with the flooring installation.
Materials and Tools:
- Specialists: Access to professional-grade materials and equipment ensures a higher quality result. Specialists know which products are best suited for specific subfloor conditions.
- DIY: Homeowners may not have access to or be aware of the best materials and tools, potentially compromising the outcome.
Efficiency and Convenience
Time-Saving:
- Specialists: Professionals can complete the leveling process quickly and efficiently, minimizing disruption to your home or business.
- DIY: A DIY project can take significantly longer due to the learning curve and potential for trial and error.
Hassle-Free:
- Specialists: Hiring a professional allows you to avoid the physical labor and stress associated with floor leveling, especially for large or complex areas.
- DIY: DIY projects can be physically demanding and stressful, particularly if issues arise that you are not equipped to handle.
Risk Management
Error Reduction:
- Specialists: Professionals are less likely to make mistakes that could result in costly repairs or rework. They know how to properly prepare the subfloor and apply leveling compounds.
- DIY: Errors in leveling can lead to uneven floors, gaps, or damage to the flooring material, requiring additional time and money to fix.
Safety:
- Specialists: Professionals are aware of safety protocols and can handle materials and equipment safely, reducing the risk of injury or accidents.
- DIY: Lack of knowledge and experience can lead to safety hazards, such as improper handling of tools or materials.
Long-Term Benefits
Durability and Performance:
- Specialists: Proper leveling by a professional ensures that the flooring will perform well over time, with reduced risk of issues such as creaking, gaps, or uneven wear.
- DIY: Poorly leveled floors can lead to long-term problems that affect the performance and lifespan of the flooring.
Warranty Protection:
- Specialists: Professional installation often comes with a warranty that covers their work, providing peace of mind and protection against future issues.
- DIY: DIY installations may void manufacturer warranties if the subfloor is not properly prepared, leaving you unprotected in case of problems.
Professionalism Means Quality
While a DIY approach may seem cost-effective initially, the benefits of hiring a professional floor leveling specialist—such as expertise, quality, efficiency, risk management, and long-term performance—often outweigh the initial cost savings. Professionals ensure that the subfloor is prepared to the highest standards, leading to a successful and durable flooring installation.
Cost to Level Concrete Slabs and Timber Subfloors: Professional vs. DIY
The cost to level flooring for a concrete slab and a timber/wooden base subfloor in Australia can vary based on whether the work is done by a professional or as a DIY project. Here’s a detailed breakdown of price for both options:
Cost to Level a Concrete Slab
DIY Costs
Self-Leveling Compound:
- Material Cost: AUD 30 to AUD 60 per 20kg bag.
- Coverage: A 20kg bag covers approximately 4-5 square meters at 3mm thickness.
- Total Material Cost for 50 Square Meters:
- 10 bags (if only minor leveling is required) to 15 bags (for more significant leveling).
- Cost: AUD 300 to AUD 900.
Additional Supplies:
- Tools: Trowels, buckets, mixers, etc. (One-time investment): AUD 100 to AUD 200.
- Primers: Depending on the type: AUD 50 to AUD 100.
Professional Costs
- Full Service (including materials and labor):
- Cost per Square Meter: AUD 20 to AUD 40.
- Total Cost for 50 Square Meters: AUD 1,000 to AUD 2,000.
Cost to Level a Timber/Wooden Base Subfloor
DIY Costs
Plywood Overlay:
- Material Cost: AUD 50 to AUD 100 per sheet.
- Coverage: Each sheet covers approximately 2.88 square meters (1.2m x 2.4m).
- Total Sheets Needed for 50 Square Meters: Approximately 18 sheets.
- Total Material Cost: AUD 900 to AUD 1,800.
Self-Leveling Compound for Timber Subfloors:
- Material Cost: Similar to concrete leveling compounds, AUD 30 to AUD 70 per 20kg bag.
- Coverage: Similar to concrete, 4-5 square meters per 20kg bag.
- Total Material Cost for 50 Square Meters: AUD 300 to AUD 1050.
Additional Supplies:
- Tools: Trowels, buckets, mixers, etc. (One-time investment): AUD 100 to AUD 200.
- Primers: Depending on the type: AUD 50 to AUD 100.
Professional Costs
Plywood Overlay (including materials and labor):
- Cost per Square Meter: AUD 20 to AUD 40.
- Total Cost for 50 Square Meters: AUD 1,000 to AUD 2,000.
Self-Leveling Compound for Timber Subfloors:
- Cost per Square Meter: AUD 45 to AUD 80.
- Total Cost for 50 Square Meters: AUD 2250 to AUD 4000.
Summary of Costs
Concrete Slab
DIY:
- Material: AUD 300 to AUD 900.
- Tools and Supplies: AUD 150 to AUD 300.
- Total: AUD 450 to AUD 1,200.
Professional:
- Full Service: AUD 1,000 to AUD 2,000.
Timber/Wooden Base Subfloor
DIY:
- Plywood Overlay: AUD 900 to AUD 1,800 (materials only).
- Self-Leveling Compound: AUD 300 to AUD 900 (materials only).
- Tools and Supplies: AUD 150 to AUD 300.
- Total for Plywood Overlay: AUD 1,050 to AUD 2,100.
- Total for Self-Leveling Compound: AUD 450 to AUD 1,200.
Professional:
- Plywood Overlay: AUD 1,000 to AUD 2,000.
- Self-Leveling Compound: AUD 2250 to AUD 4000.
These estimates provide a comprehensive overview of the potential costs involved in leveling floors in Australia. The actual costs can vary based on the specific conditions of the subfloor, regional pricing differences, and the quality of materials chosen. It’s recommended to obtain multiple quotes from professionals to ensure competitive pricing and quality service.
Comprehensive Conclusion on Floor Leveling
Floor leveling is a critical aspect of preparing subfloors for various types of flooring installations, including timber, engineered timber, laminate, hybrid, and vinyl plank. Ensuring a flat and smooth subfloor is essential not only for aesthetic purposes but also for the long-term performance and durability of the flooring.
Mastering floor leveling is essential for achieving a successful and long-lasting flooring installation. Whether you’re preparing a concrete slab or timber subfloor, adhering to standards, using quality materials, and considering professional expertise can significantly impact the outcome. DIY enthusiasts benefit from choosing appropriate products and methods while ensuring thorough preparation and adherence to manufacturer guidelines.
By understanding the importance of floor leveling, the right materials and techniques, and the potential consequences of improper leveling, homeowners and contractors alike can ensure a smooth and stable foundation for their flooring investments, enhancing both aesthetics and functionality in their spaces.